Tuesday, January 29, 2013

Gallery Wall - How To

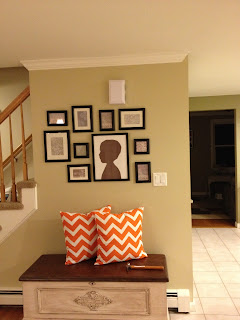
I always wondered how I could make a perfect gallery wall. I've tried a couple of times with not so good results and many holes on the wall. Also, I searched Mr. Google and didn't get any easy, good answer.
You may have figure this out already, but for me was that aha moment.

It was when I had all my frames on the floor, displayed exactly the way I wanted them on the wall - but how, how can I do this? My smartypants husband goes: Why don't you put the frames over a wrapping paper, trace your template and then we hang the paper on the wall and put the nails on?

Yes! Of course! Why I haven't done it before?

This project took me less than 20 minutes, seriously.

And now I have a pretty gallery wall :)

wrapping paper on the floor

trace your template 


hang on the wall


we put the nails right on top of each line
Done!

Laundry and Powder Room Renovation

Dreams do come true! I am a believer. After being a Pinterest addicted for over a year one of my Pin-dream project came true. The laundry room slash powder room renovation is over. And it looks beautiful! I am in love with this room and all the details.


We made no progress in this room since we moved in - except for removing the closet door that was here hiding the 1980's washer&dryer the sellers left behind and for buying this new combo - which I love, love. They look nice, are very efficient and silent.  
So, this is what this laudry/powder room looked like for about 2 years.


The room empty and ready for some action.


Washer and Dryer back in. Cabinets are Ikea's Adel. Counter top we bought a piece of MDF. For this space had to be something easy to be removed in case the machines get broken, for this reason we could not go with granite or any other fancy option. So, to give it a little something I stenciled and then applied a million coats of poly acrylic.

Here it is. It's done and I loved it.  
                                                                           
I want to spray paint the barn light fixture
miss owl. Isn't she pretty?
stenciled counter top. Making the room a little girly :)

Easy to clean toilet. I really like the design of it. The lid comes off to easy clean up. In house with 3 boys this a mus


With the DIY no sew Roman Shade that I first saw here - and then pinned to my Pinterest. I will make an extra post for my version of DIY Roman Shade. It was tricky to mount inside the window - I found a few people with the same problem. I think our solution will help. Will post soon - pinkie promise :)

Let's crunch the numbers , shall we?

Wall Paint Benjamin Moore Gray Cloud - $38
Trims/Door/Window/Crown Molding paint White Dove high gloss BM - $0.00
Stencil Martha Stewart - $0.00
Poly acrylic - $17
Counter top MDF - $35 - still have some left over for another project
Trims and leg for the counter top - $35 Lowe's
Flooring - $90 Lowe's
Cabinets - $265 Ikea
Cabinet Pulls - $12 Lowe's
Fabric for the roman shade - $10 at joann's with coupon
Toilet - $219 Lowe's
Sink - $99 from lowe's
Faucet - $89 Lowe's
Barn light fixture - $25 Lowe's
Pendant light - $9.99 Ikea
Mirror - $44.99 Ikea
Towel Ring - $16.99 Lowe's
Rug - $30 Ikea
Waste can - $9.99 Home Goods
Toilet paper holder - $9.99 Home Goods

Total: $1056
Budget: $1200

Linking up to Liz Marie Blog - Dog Days of Winter  

Tuesday, August 2, 2011

Kids bathroom renovation


Okay. I have never dealt with wallpaper till this day. I knew it had to be removed in order to be considered a bathroom. It looked terrible. The wallpaper was stuck. I used many different techniques to remove that bad boy - even a combination of water, clothes softener and a very hot steam iron - which didn't work very well. But yes, it did ruin the steam iron.


It took me more than 2 months to completely remove that 15 year old wallpaper, then clean the drywall and make it ready for the paint. It was a real nightmare! So glad that that project is over and we could move on to the next.

The color we chose was Heaven on Earth by Benjamin Moore. The sink and washbasin is Ikea's grundtal. We chose a double sink so the boys can share the bathroom without any problems. It gives this room all the modern, clean feeling that it lacked for years. The faucets we bought at Lowe's - my husband has a love relationship with said store.  We went with the easy to clean toilet, also from lowe's. The floor is laminate - against all we read this floor is here for almost 2 years and still beautiful.

Yes, I did the back splash - it was quick and easy and it added some color to the wall.

I have hung some art work (not in the picture). A few things that this room needs: a proper towel ring. I want to build some store for under the sink. Roman shades and a closet redo. It has a huge closet in here - good for a great makeover.

Fun Fact: When we were choosing the details for this room we didn't know what was on the way - Boy or Girl. I wanted to make it more neutral but it's funny that my husband kept saying: let's buy all blue, i know it will be another boy. And yes, he was right. :)


Monday, June 20, 2011

L's bedroom

The second room we tackled was L's room. It had the most boring color ever. Like a yellowish, whitish, oldish looking room. I needed to bring some bold color in. Off to the paint store we went and Mr. L chose the color himself - Sailor'r Sea Blue by Benjamin Moore.
Then came the theme - He is all about planets. So that's what we picked. I'm sure we will change this theme pretty soon, as he grows he is getting more into sports, to be more specific - Basketball.
I totally see we doing some Celtics theme in a near future. Here are a few pictures of what the room looked like when we just moved in and what looks like today.
We kept the ikea shelves, bought him a big boy's bed, changed the bedding and the curtains. The shelves are cluttered with his Legos. I need to come up with a storage solution for his Legos sets before it gets out of hand. My plan is to have a Lego room in the basement. Many storage space, a table for him to work on it and some shelves to display his creations. For now, we will use this space and the playroom.
In the near future we will replace the carpet, probably install laminate flooring. Thank goodness for a handy husband :)


Stay Well,
Flavy

Wednesday, May 4, 2011

if mommy ain't happy, ain't nobody happy...

That's so true. And, for mommy to be happy give her a nice equipped kitchen with all new appliances. That was our deal when we settled for this house - hubby would replace the refrigerator and the old-rusty dishwasher that came with the house. oh, and not to mention the washer&dryer combo - they looked like something from the 80's. Sure, I cant complain. When you buy a house it's such a big compromise. Our decision was made based on the three golden rules in real estate investment: 1) location; 2) location and 3) location. Then it comes the price, how old the house is, garage, potential for remodeling slash building an addition if needed and so on. But on this list what came last to us was the appliances, the old kitchen and the outdated bathrooms - that all can be replaced and you can make the way you want. Give it your personal touch to each and every room. okay! enough with that. Let's get back to kitchen and its appliances.


Stay Well,
Flavy

Saturday, April 2, 2011

Our new house - Our Home

This is our new house. In March 2011 we moved in to this place to start, yet, another chapter. It was after a long house-hunting process that we fell in love with this colonial in the countryside of a small town south of Boston. From now on, let the renovations begin. We learn as we go. Please, join us on the process of turning this house into our home sweet home.

Stay Well,
Flavy